@barry
Forum Replies Created
-
AuthorPosts
-
 BarryKeymaster
More on the way.
BarryKeymasterGoing through these fast.
BarryKeymasterVolume is indeed Volume and Level is Level of Effect or Compression.
If you want to dig further there are many resources in regards to Release in compression. I will link one below.
I would say that if you are David Gilmour a slow release is fine but if you are Steve Vai you may like a much quicker Release.
Here is a link with info: Compression Attack and Release
BarryKeymasterSweet! I love this circuit!
I got some very inspirational tones to create some original jams without putting much thought into it.
Thanks for sharing!!
BarryKeymasterSorry for the issue.
The schematic drawing from the build document below is correct…
however the actual basic “Mod” wiring diagram was drawn in error.
Here is the updated diagram and you can see how it now matches the schematic above.
Again sorry for the inconvenience. I have updated the Build Document.
BarryKeymasterEasy & Neat Combo Build Wiring
Note: While we show wiring to the 3PDT board going in through the top for clarity we actually prefer to wire the 3PDT board from underneath before finally soldering to the foot switch.
BarryKeymasterYep that did not occur to me.
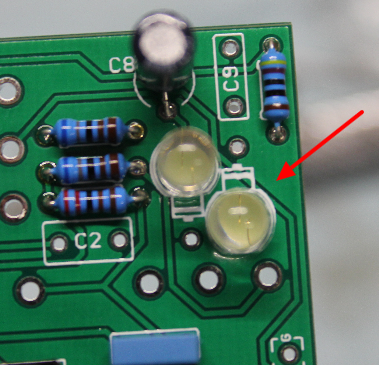
BarryKeymasterBarryKeymasterLooks like at least one of the LEDS is in backwards BTW
The Cathode is the flat side.
BarryKeymasterIn case you wished to use use silicon or germanium instead.
BarryKeymasterFor that in depth publication Big O email me and I will send you a board to play with.
BarryKeymasterHi and Welcome,
Switch your Ring and Tip Wires at the Jack. At a glance it looks like these are backwards. See Billy’s Photo of the Jack.
A bit of helpful critique if I may:
You may need to do some board cleanup and reflow as there are a blobs of solder at pads that may be hanging on by a thread. With wire you should strip off a bit of wire and place it through the pad till the protective jacket is flush with the board and then solder the wire to the pad as you would a component lead. You can even move the wire forward while heating to be sure it is flush. Then trim the excess if any. Be sure to use a Fine Conical Tip when soldering wires or components to the board. Also .031 Solder diameter is best.
I hope that helps.
May 30, 2020 at 10:42 pm in reply to: “Luna MODulus” (Dr Phybes) Phase / Vibe build – Awesome tones! #13123BarryKeymasterAnother very nice build and demo. I agree that the Script is subtle. I very much like the Wilkie1 45/90 Mod for my taste so give that a try sometime and I could hear some excellent Yes, RUSH or Floyd tones just begging to be played.
Thanks again for the share!
BarryKeymasterThat is a sharp looking build. I am glad you enjoy it. The demo sounds great and I agree since I did a similar thing with my Fender Twin and it just opens up a lot of new tones you would not otherwise have available. I love the Two Rock as well BTW.
Thanks for sharing!
BarryKeymasterThe Stage 3 is a good clean boost that I have always had on my pedal board. If you want a similar circuit with the features of both clean and dirty then try a XX Double shot for a switchable version. Our SHO type circuit has a volume control. Also while the Stage 3 hits Unity at around 1:00 this can also be changed by a simple resistor to ground making Unity at the beginning of the rotation. Either way it all works the same.
BarryKeymasterVery nice looking build. Thanks for sharing.
BarryKeymasterThat entirely depends on your build.
Are all the Capacitors used in your project rated well above the minimum 18v specs?
I would not try it if you have any capacitors rated at 18v or below. You will need to check datasheets for your type. Also the LED is going to be an issue.
-
AuthorPosts