@barry
Forum Replies Created
-
AuthorPosts
-
 BarryKeymaster
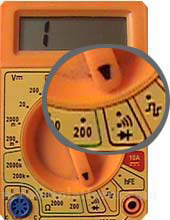
These are multi-layer PCBs so you are not going to see all traces. That said the boards are 100% verified before being put up for sale. You can easily check the continuity of traces though with your DMM in “Beep” mode.
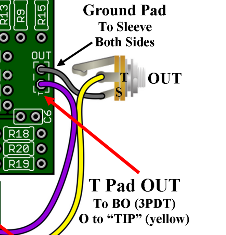
UPDATE: Check that you connected I and O if using a 3PDT wiring board or lugs 2 and 8 of a standard 3PDT switch to the actual TIP of both jacks. Use the GUIDE below to verify.
I hope that helps.
BarryKeymasterSweet…
I appreciate the details and suggestions. Looking forward to the final chapters.
BarryKeymasterHere is a good video that describes the Treble Bleed Mod I described above:
BarryKeymasterYou are testing the output (loudness) of each pickup depending on the pickup selected. Your pickups are 10K. (Van Halen range) These high output pickups act as an extra gain control feeding into your pedal so as result when you use your guitar only on 10 or full up you are limiting your “available” amount of clean tones. Fortunately the output is easily adjusted by the Volume control. The complete part of any pedal circuit starts with the amount of output being fed into it.
I would check out some videos on adjusting your guitar volume control, tone controls and pick attack to allow you a much wider pallet of “available” control over your pedals (no mods required). If you are experiencing treble loss there is a simple mod for your guitar called a treble bleed utilizing a cap and resistor so you don’t lose treble.
If you wish to achieve cleaner tones with your gear it is not necessary to change your pickups but it will be necessary to utilize your guitar volume (reducing the Gain of your pickup output). I am not referring to dificult manipulations similar to the swells produced by Jeff Beck but simply adjusting the guitar volume to eight, six or five depending on the desired tone and leaving it there till a change is required to broaden your overall tone.
Here is the first Video I grabbed which hopefully will be a good start:
I would jump ahead to 1:20 as he is very chatty.
I hope that helps.
BarryKeymasterAs per the schematic above the switch adds or removes resistance.
It could be thought of as a switch for higher output or lower output pickups commonly referred to as Les Paul or Strat settings although that analogy is based on your perspective. Maybe you just want less gain no matter?
I would expect your guitar to have high output pickups based on the critique of this circuit and the Blues Buster circuit in the other thread. This can easily be tested by plugging in a guitar cord to your guitar and testing the sleeve and tip of the other end with your Multi-Meter to get the readings from your pickups. I use vintage wound pickups always (all 8k or under) and easily get a wide variety of Drive & Clean tones. If your pickups read 10k output or higher I would not expect to easily achieve as many clean tones. The guitar essentially is part of the entire circuit.
If you find after testing the output of your pickups that they are vintage wound and you still have way too much Drive then it is likely a build issue and you should begin troubleshooting.
BarryKeymasterPer the schematic shown above you are incorporating clipping options of D1, D2, D3 & D4 or just D5 and D6 with the switch. See arrows.
That said I would finish the build first before going 100% on a Troubleshoot.
Additionally I would expect your guitar to have high output pickups based on the critique of this circuit and the Overdrive circuit in the other thread. This can easily be tested by plugging in a guitar cord to your guitar and testing the sleeve and tip of the other end with your Multi-Meter to get the readings from your pickups. I use vintage wound pickups always (all 8k or under) and easily get a wide variety of Drive & Clean tones. If your pickups read 10k output or higher I would not expect to easily achieve as many clean tones. The guitar essentially is part of the entire circuit.
If you find after testing the output of your pickups that they are vintage wound and you still have way too much Drive then it is likely a build issue and you should begin troubleshooting.
BarryKeymasterThat looks like a License Plate to me on second look. Really cool.
BarryKeymasterThat looks amazing. Appreciate the mod as well. Thanks for sharing!
BarryKeymasterVery nice!
Thank you for sharing and your thorough description!
BarryKeymasterIf you go to our GUIDES PAGE you will see a link to our old site host.
That said to save you time here is the link to the old MORC Page in the Layout Gallery
Here is the link to the actual Build Document.
BarryKeymasterYes or half the supply voltage.
BarryKeymasterIn case you actually do not know where to put the DMM probes to get voltages read page 8 of the Crash Course Guide found on our Guides Page.
BarryKeymasterHere is an attempt at a new diagram:
Does anyone think this new diagram will prevent T Pad mistakes?
BarryKeymasterSo the T Pad In/OUT graphics with Red arrows pointing to the T Pad in the Silkscreen does not grab enough attention? I know it is noticeable now after the fact but the point is to make it clear before there is a mistake.
It is not always convenient to put the Pads in the exact same orientation (hence the Pads marked T) depending on the Layout so I was really hoping this would be more intuitive. Alternately I do not want a sheet too cluttered up likely having the opposite effect of what I am going for.
If there is a better idea I am all ears but it must be a one design fits all diagram since the Emexar and other Build Documents already have the correct wiring by orientation for each specific build.
The point is I was hoping to have an intuitive One Size Fits All Diagram for people to refer to without always having to printout the entire build document.
BarryKeymasterHere is an image taken from the Guides Page to print out.
This will be a reminder since all builds work the same.
BarryKeymasterAnswer to main question about Voltage:
Voltage is about physical size and also to make sure you have at least your 9v power supply covered. Voltages on old build docs were listed to prevent people from ordering very large parts and is not meant that you buy a particular voltage for any reason as it simply does not not matter. It is only meant as a minimum guideline. In other words 13v to 63v covers your power supply and your Components will all be Pedal Size. (see the Guides Page for detailed reading covering this).
Answer to question about where to find Guidance beyond the basic build document:
See the two images below so you can easily find the Guides Page links:
Image 1:
This one is on the Forum Home Page:
Image 2:
This one is on our Home Page at GuitarPCB.com:
Post a trouble shoot thread and we are glad to help.
BarryKeymasterCheck your Germanium Diodes very closely as they are FRAGILE so if you accidentally chip one when installing them then it will kill the sound.
-
AuthorPosts