
Your Source for DIY Pedal PCBs and NostalgiTone! › GuitarPCB Forum › GuitarPCB Build Support › Emexar 250 Build (solved)
- This topic has 12 replies, 5 voices, and was last updated 7 years, 6 months ago by
 Anonymous.

-
AuthorPosts
-
April 14, 2019 at 8:02 pm #5221AnonymousInactive
Lights are on but nobody is home. Clean guitar tone when pedal is in bypass, but no audio when the effect is engaged. D3 has a jumper in it.
Do I have the pots mounted wrong? Not sure how else I’d fit surface mount pots inside this enclosure. I appreciate the help. Cheers!!!
April 14, 2019 at 9:08 pm #5223AnonymousGuestDouble check your wiring as shown in the guide here:
I can’t see if you have the IN jack connected to the 3PDT board.
April 14, 2019 at 9:44 pm #5224AnonymousInactiveSwitch in & out
Board in & out
April 14, 2019 at 10:12 pm #5225AnonymousInactiveJust did a continuity test with my multimeter and when the effect is on both output leads (ring&tip) are grounded. That’s at the output jack, at the circuit board and at the switch circuit board.
When in bypass mode the ring is grounded and the tip is not.
Bad switch or switch PCB? Thoughts?
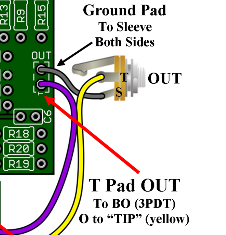
April 14, 2019 at 10:34 pm #5227CybercowParticipantFrom what I can see in the photos, it appears that the output wire is connected to ground of the 1/4″ jack. Look closely and with intent at the silk-screen on top of the PCB and notice the little “T” next to the input and output pads. The “T” indicates “TIP”. The “T” connection points are what need to go to the “BI” and “BO” connection pads on the stompswitch daughterboard. Double-check that and let us know please.
April 14, 2019 at 11:11 pm #5229AnonymousInactiveThat was it!!! I had never noticed the little T before. Even went back and looked at previous builds with which I had gotten lucky to have the wires on the proper terminals. Thanks to you both for the guidance. Cheers!!!
April 15, 2019 at 1:18 am #5230CybercowParticipantClintird – Happy to help. It’s usually the little things that trip us up.
April 15, 2019 at 11:39 am #5231BarryKeymasterHere is an image taken from the Guides Page to print out.
This will be a reminder since all builds work the same.
April 15, 2019 at 1:04 pm #5232AnonymousInactiveBarry…that’s the doc I followed…put the wires in the same order as that picture. Did not pick up on the “T” printed on the PCB. Never noticed them until last night and I use a magnifying glass helping hands to assist my tired eyes. Full on rookie mistake. Thanks for the guidance.
April 15, 2019 at 3:26 pm #5237BarryKeymasterSo the T Pad In/OUT graphics with Red arrows pointing to the T Pad in the Silkscreen does not grab enough attention? I know it is noticeable now after the fact but the point is to make it clear before there is a mistake.
It is not always convenient to put the Pads in the exact same orientation (hence the Pads marked T) depending on the Layout so I was really hoping this would be more intuitive. Alternately I do not want a sheet too cluttered up likely having the opposite effect of what I am going for.
If there is a better idea I am all ears but it must be a one design fits all diagram since the Emexar and other Build Documents already have the correct wiring by orientation for each specific build.
The point is I was hoping to have an intuitive One Size Fits All Diagram for people to refer to without always having to printout the entire build document.
April 15, 2019 at 4:03 pm #5238BarryKeymasterHere is an attempt at a new diagram:
Does anyone think this new diagram will prevent T Pad mistakes?
April 15, 2019 at 4:36 pm #5239AnonymousInactiveI totally missed it, but I am a special kind of dumb. However, in my opinion the new layout clarifies and doesn’t add too much clutter. Know this though…I’ll never miss another printed “T” on a PCB. 🙂
April 23, 2019 at 11:24 pm #5462AnonymousInactiveI also have made the same mistake as you, Clintird…more than once! I like this new diagram Barry has done. I’ll likely not miss another “T” on a GPCB! Thank you, Barry!
-
AuthorPosts







- You must be logged in to reply to this topic.