
Your Source for DIY Pedal PCBs and NostalgiTone! › GuitarPCB Forum › GuitarPCB Build Support › Running 9v at 18v
- This topic has 7 replies, 3 voices, and was last updated 1 week, 3 days ago by
 e_man.

-
AuthorPosts
-
October 29, 2026 at 1:19 pm #40862e_manParticipant
What would need to be changed to operate the MULE at 18v?
What would need to be changed to operate the KICKER at 18v?
I know they both have a charge pump, but didn’t want to risk damage to the circuits.
Thanks for any help.
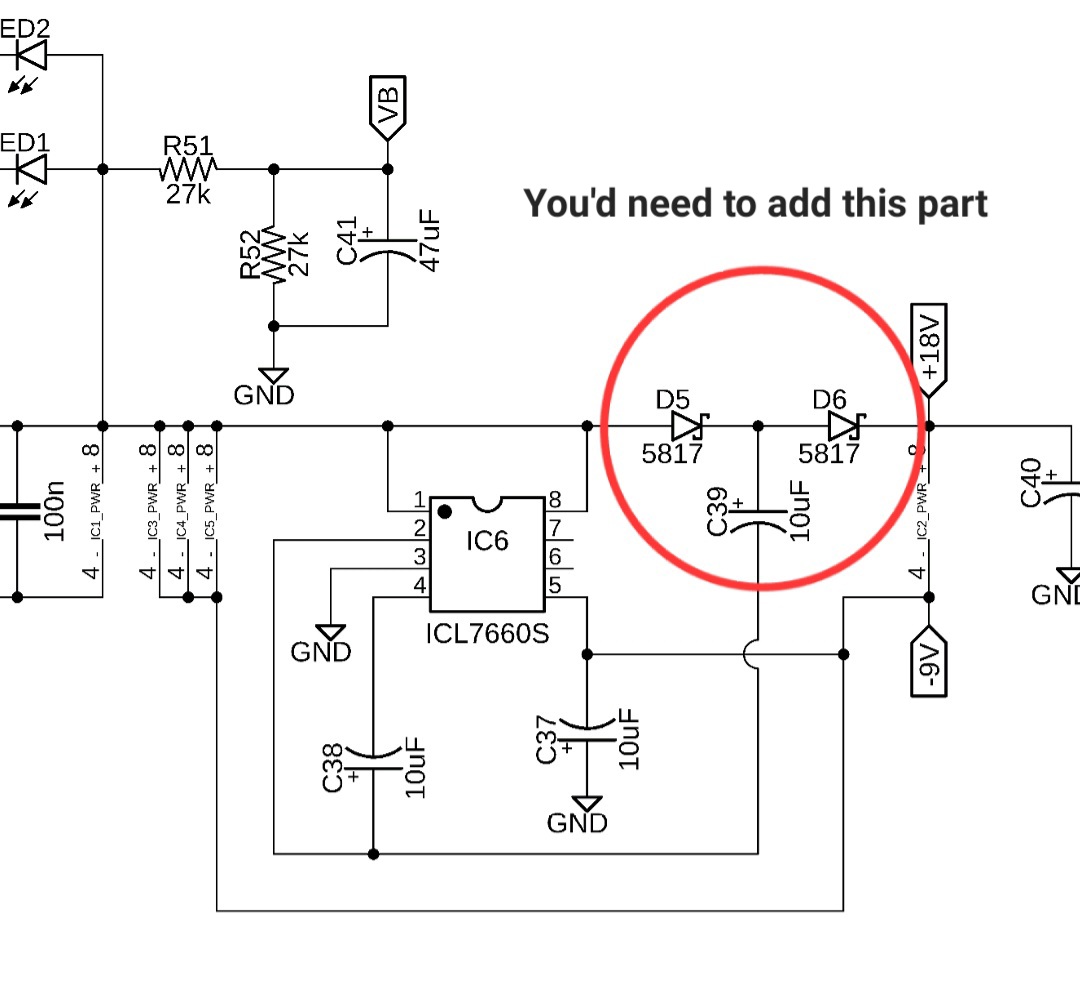
October 29, 2026 at 3:15 pm #40864BillyModeratorI think if you’re going to use the 7660S you’d need to add a cap and 2 diodes to turn it into a voltage doubler as well as a voltage converter the same as the mule kicker combo circuit
Obviously you’d need to ensure everything is rated for 18v particularly electrolytics if it were me I’d leave the 7660S part of the circuit empty and build it on a piece of vero and connect it appropriately
It’s do-able but not without a fair bit of work
You could cut traces and add your extra components but to me the benefit wouldn’t be massive running it at 18v even with a 9v input you’re probably going to get closer to 16v with the voltage drop through components like the 2 diodes
It’s not simple because you need -9v for ground that part is already taken care of you just need to double the 7660S output voltage
October 30, 2026 at 3:38 pm #40868e_manParticipantThanks for the reply Billie,
I’ll probably pass on this modification.
I was looking for a solution to having one 18v circuit and two 9v circuits in the same enclosure.
I guess I could install two power jacks and do dual voltages.
Anyways, thanks again for your reply, I appreciate your knowledge and experience.
October 30, 2026 at 8:39 pm #40871Jeff24ParticipantThere are at least 3 3PDT wiring boards that I’m seeing at multiple sites; these wire up a standard footswitch to a 9 to 18V charging pump. You wire these as you would any other 9V board and these boards provide 18V to whatever you’d like:
– Aion offers an “18V Bypass”
– PedalPCB offers a “3PDT Charge Pump Board”
– Amplified Parts offers part “P-PC-DOUBLER-SWITCH”, +18V from +9V, 3PDT Switch Mount
Only the Amplified Parts board offers an LED option; I’m not sure how to adjust the LED resistor on the actual effect board. I’m thinking a 4k7 resistor at 9V would need about a 10k resistor at 18V if my math is correct. Maybe that’s not an issue and I’m overthinking it.
October 30, 2026 at 9:06 pm #40872e_manParticipantThanks for the info Jeff.
I’ve seen the Pedal PCB offering but wasn’t aware of the Aion and Amp Parts boards. I’ll look into them for sure.
Yeah, I would think double the voltage, double the value for the LED CLR.
Thanks again.
October 30, 2026 at 10:31 pm #40874Jeff24ParticipantOn the Aion page:
“It is not compatible with any project that has its own on-board charge pump or voltage inverter.”
If it’s already being pushed to 18V, you’re doubling it to 36V.
The fact that there’s a charge pump on the effect board means someone already beat you to the punch.
October 31, 2026 at 10:55 am #40875BillyModeratorWhat particular circuit of the 3 do you want to run at 18v I’m assuming you’re using 3 separate pcbs do they all have a bipolar supply using a charge pump
A 7660S maximum input voltage depending on what datasheet you look at is between 10 and 12v a pin compatible LT1054 up to 15v so plugging 18v straight in isn’t an option you’d need a charge pump with a suitable voltage rating to do that
As Jeff24 says it’s already 18v with the + rail +9v and negative -9v so rail to rail 18v on ICs 1,2 and 3 of the mule and +18v and minus 9v on IC2 of the kicker 27v rail to rail so there are differences with those 2 circuits
October 31, 2026 at 1:35 pm #40880e_manParticipantWell, first I’m a little embarrassed by something I was reminded of in the build documents for this board.
But to your question Billy, my question was motivated by a high frequency “whine” in the circuit once built. I initially installed a 7660sc since I didn’t have a 1044sc on hand (or so I thought). When I ran the circuit at 18v it was perfectly quiet and actually sounded better. So the questions about running the 2 circuits at 18v was about possibly doing a triple combo and running them all at 18v if possible.
I read online that someone on PedalPCB’s forum that a build of the Cobbler preamp (their ver. of the Victory V1 Copper) was cured of it’s noise by using a 1054cp. So, I ordered some 1054s, but alas, still the noise.
In the process of verifying component placement and values, I noticed in the build document that a 1044sc was recommended for this circuit. I searched my collection of ICs and discovered a 1044sc. So I installed the 1044sc and voila’! no noise! (This happened late last evening).
Thanks everyone for your help. I hope this doesn’t deter you from replying to my posts in the future. I appreciate Barry and the place he’s built here.
-
AuthorPosts


- You must be logged in to reply to this topic.