Your Source for DIY Pedal PCBs and NostalgiTone! › GuitarPCB Forum › Show Off Your Build › Ornery Shrews Treble Booster
- This topic has 6 replies, 5 voices, and was last updated 3 years, 2 months ago by
 Anonymous.
-
AuthorPosts
-
November 12, 2022 at 1:20 pm #26707Big OParticipant
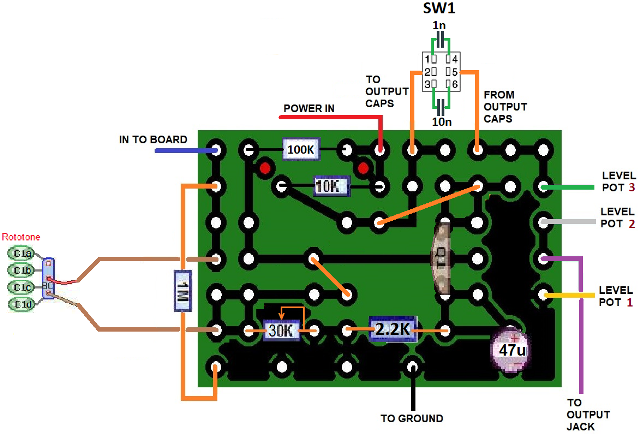
For my 4th and last Hornby Skewes/Blackmore inspired Treble Booster, I built a pedal similar to the Ge Hornby Skewes, which Blackmore first used prior to changing to a Si based HS booster (of which I have built 3). I could not find a nailed down, official schematic for the Ge version and there appears to have been some changing of components or slight differences in schematics. I used schematics found on the internet as well as gutshot photos of originals. Some had a 1K Emitter Resistor while others had ones with a 2.2K value. The photos showed Emitter Resistor Bypass Capacitor values of 100uF and 125uF, which would be needed for a 1K Emitter Resistor value, but using a 2.2uF Emitter Resistor, calculations show that a 47uF would suffice in this situation and is what I used. The old schematics showed fixed 100K and 10K resistors for the bias network (0.8V base voltage), but I chose a 30K trimmer which I had on hand to set a base voltage of around 1.1V similar to a Rangemaster. Below is my base working schematic diagram.
I further altered the circuit through experience building Hornby Skewes like boosters and added a “Thick” switch to the output capacitor to change from the standard 1n value to a 10n value, which “thickens up” the sound to my ears. Also, I used a Rototone to be able to switch between different input caps (10n, standard 22n, 33n and 47n) to get various tonal variation of the pedal. Blackmore supposedly had the input cap on his pedal changed, possibly to 47n, but nobody knows for sure. The 10n setting gives the pedal more of a Rangemaster sound. For me, this pedal is very versatile as a treble booster. The GBOF layout is below, if anyone cares to build a similar one.
I did screw up building the pedal as I made a rookie mistake and soldered the power wire one eyelet/solder pad over from the correct one. I got true bypass, but no sound from the pedal when firing it up the first time. Using a DMM to check voltages and continuity, I discovered no continuity to the 100K bias network resistor from the power wire and the collector voltage was the same as the input power wire, which it should not have been and directly led me to the problem. Once I switched the power wire to the correct eyelet, the pedal powered up and worked exactly as it should – just like on the breadboard prior to building the pedal.
Above, you can see the bias trimmer mounted on the inside wall of the box, the output cap switch at the top, Rototone in the middle and the HS GBOF circuit PCB at the top corner over the boost control pot. A 100 HFE NPN Germanium transistor obtained from Small Bear is mounted in the sockets. Below is the finished exterior. Just love this pedal for classic treble boosted tones!
November 12, 2022 at 5:01 pm #26711ChuckParticipantThat’s cool, but you might have a worrying obsession there (that I may have to join you in).
Chuck
November 12, 2022 at 7:32 pm #26714PlaysforfunModeratorExcellent write-up and information Big O. Lots of nice work there. What do you use to smooth out your waterslide labels. Little bubbles can be a reappearing pain sometimes for me.
November 12, 2022 at 10:18 pm #26716Big OParticipantRe: What do you use to smooth out your waterslide labels. Little bubbles can be a reappearing pain sometimes for me.
I use a Q-tip and unbelievably my finger. I also clear coat the clear coated waterslide decal once it dries for about 24 hours and that usually does away with some of the imperfections such as small air bubbles. Acrylic lacquer is what works best for me.
November 13, 2022 at 9:34 pm #26720SteveModeratorI find using Micro Sol Microscale BMF128 Setting Solution really helps with getting the decals sorted out. It can be found on Amazon or other outlets on the internet. I also agree with Big O using acrylic lacquer after the decal has set for at least 24 hours. 48 hours, for me, is the magic number. 😉
November 13, 2022 at 10:29 pm #26721Big OParticipantI was using Microsol, but I had some trouble with it trapping tiny bubbles on occasion and further manipulation of the decal as it was setting with the Microsol was problematic. So, I went back to the Q-tip and gentle fingertip method for sweeping the bubbles to and off the edge of the decal.
November 17, 2022 at 11:38 am #26748AnonymousGuestGreetings from Cajah’s Mountain ????…
Most beautimously rendered pedal, my friend.
Especially the anatomically, and attitudinally, correct rendition of an clearly Ornery Shrew.????
My usual way of dealing with bubbles in waterslide decals, specifically those that don’t relent to the squeegee, is to use an Xacto knife tip to carefully make a slit in the bubble from edge to edge.
Then, using a moistened fingertip, I smooth out the bubble. Finally, I use a clean, dry cloth to dab the surface dry. I usually do this before any overcoating, but have had success on some after clear coating by adding another coat afterwards.
I’ve used this technique for years on plastic model cars, airplanes, and rockets and I’m sure that it’s familiar to most all of y’all, but, I thought I’d bring it up again.????
P.S. I’ve been AWOL from here for a while due to various and sundry issues concerning family and the ol’ homestead.
Thanks to the Lord, these things are not the problem they were before. ????????
During that time, I have been working on my ongoing projects and using what I have learned to go back and address issues I ran into on earlier builds, but, I will definitely be needing the expertise y’all bring to the table to continue this “minor” obsession I have cultivated here.????
-
AuthorPosts


- You must be logged in to reply to this topic.